Posts

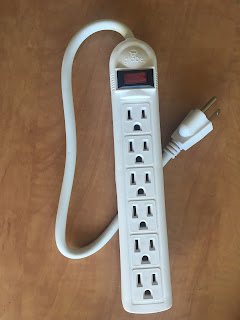
Reversed Engineering: Final Power Bar Model

Image
  The final touches for the reversed engineering project have now been officially completed. I tried my very best to replicate my model to the original design and measurements as much as possible, and I am very happy with the final result. This project was extremely time consuming and with the amount of issues that I had to deal with along the way, I am just glad to move onto other projects. It was quite frustrating modelling a specific piece only to realize I measured it wrong. Despite that, I do feel like I learned a lot from this project that I wouldn't have otherwise, so I am glad that I took this on. A part of me wishes I chose a simpler object to model, but I am glad that I challenged myself and learned so much along the way. I am proud of everything that I was able to accomplish with this project. Exploded Model

Reversed Engineering: Update and Progress on the Power Bar Model

Image
  As a continuation of the reversed engineering project, I have continued to model the power bar and have successfully created all the major parts in 2D. At this point, I am almost ready to extrude my pieces and finish modeling the final object. I hope to have all the pieces modeled accurately and finish within the given time of the project. I have the two major pieces along with the inside views made in 2D, along with the long metal strip that sits in the middle. Hopefully the rest of this project will go much smoother than my last update. I am looking forward to working on more.

Surface Design: Final Lasercut

Image
  Here is the final lasercut design for the surface design project. I played around with the values quite a bit before cutting, so that I'd get the perfect result the first time around. I am super happy with how all the different values translated into the wood. It created a visually interesting final product that I am extremely happy with.

Reversed Engineering: Taking Apart The Object

Image
 As a follow up to my previous post, I decided to choose the power strip as my object for this project. Unfortunately, I ran into a multitude of problems when beginning this project that made things a lot more difficult for me. My first issue arose when I bought a digital caliper off of amazon only it to break as soon as I opened it from the box. My luck only goes downhill from here. Next, I was having issues opening the power strip, as not a single screwdriver I could find could even open the thing. I eventually had to borrow both the caliper and a specialty screwdriver from my roommate, so shoutout to Becca, you are a literal lifesaver. I literally would have made zero progress on this project without her. Moving on, I began to observe my object and start sketching. I wrote down a bunch of measurements and made a quick sketch of all the neccesary parts before finally moving into Rhino. I really tried to get a base down this week so that I had at least a little progress in the pro...

Reversed Engineering: Deciding The Perfect Item To Take Apart

Image
Here's the beginning of my planning for the Reversed Engineering project. I'll be honest when I say that this was a very difficult process for me. I had very little items that I was comfortable in messing around and potentially taking apart. I felt a bit restricted being in dorms as I only have the necesssities with me, while imagining all the cool and interesting objects I have back at home in BC that would be perfect for this project. But alas, I must work with what I have available. The first object that I thought would be cool to take apart and recreate was this power strip. I think recreating all the little grooves and holes in Rhino would be super fun, so this is the item that I'm currently leaning towards.  The next item is this headlamp that I found. I thought it would be interesting to look at the inner workings of it, specifically how all those small parts fit together, but it's definitely not my first choice. And finally I decided to take a look at my old com...

Surface Design Research and Final Product

Image
Over the past two weeks I was tasked with researching and creating my own surface design using the 2D tools in Rhino such as layers and hatching.   From the research I gathered, I knew I wanted to go with a floral design, but I also wanted it to be a bit playful. I really liked the camo pattern I found on one of my jackets, so I took a lot of inspiration from that when it came to the background of my design. I wanted it to sort of represt either clouds or patches of water, but also represent the camo pattern in the core design. I really like both the floral and aquatic feel my design has, giving it a bit of a unique twist. I honestly could see it being a great pattern for a dress. Here are all of the surface design inspiration images I found while doing research for this project: Looking at all of my images, it's clear to me which ones inspired my final design the most, and I'm quite happy with the result!

Rhino Castle: Creating a Steampunk-Themed Palace

Image
 I'm back again with another 3D Rhino Model, tasked this time with creating a castle. Immediately I wanted to try something a little different, and really push how far I can go with a design and still make it represent a castle. Now because I love steampunk, I used that as a major inspiration for my design. I integrated gears and pipes all over the structure of the castle, and I think it added somer really nice touches to the final design. I mostly used the extrudecrv tool, since it was much easier to make all my original shapes in 2D, and then transform them into 3D objects. I also placed some other abstract structures using the loft tool that surround the main castle, which resulted in the gear tower in the middle. I like how striking the large gear became, it really brings the whole thing together. Overall I am really happy with my work and I'm excited to continue working in Rhino 7 this year!